| |
|
|
| |
here is a guide to how the avatars are put together in Kudos 2, and how you can mod your own clothing for them if you have a bit of patience, some artistic skill and a suitable graphics editing program!
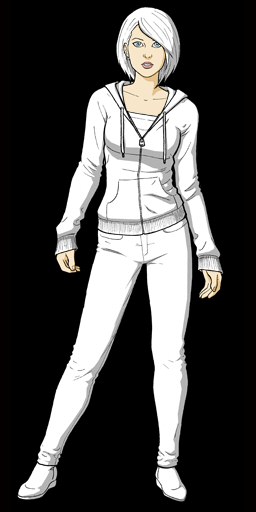
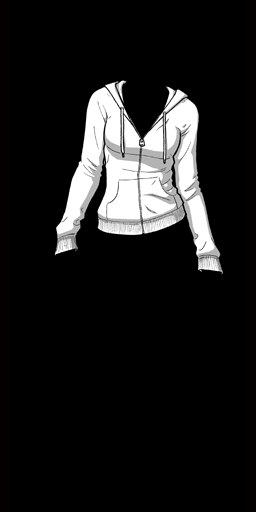
Ok, to the right is one of the avatars in the game, and a seperated graphic showing one of the jackets. As you can see, the files are all black and white to allow color tinting by the player, but you can add colors if you want (like the base skin color) and they will show up fine. There is no way to prevent the player tinting them further however :D
The avatars are made up on a big list of layers built up from back to front. Some layers can sometimes be hidden when not needed, so you can wear no shoes, or have a bald male character, or omit the coat layer.
In addition to optional layers there are some special 'hidden ' layers which are linked to 'parent' layers. A good example is some of the hairstyles. They have a 'top' layer and a bottom layer, so that some hair can appear behind the characters body and some lays on top. When you change the top layer, the bottom one changes to match automatically. The jacket layer shown on the right also has a linked 'behind' layer for this reason.
The layers are made up of two parts. there are the actual graphic files (which are in DDS format) and the default ones can be found in the games kudos 2\data\bitmaps\avatars directories. And there are also 'layer' files which are just text files that describe how the layers work. These can be found in
kudos 2\data\avatarlayers.
|
|
 |
 |
To make the games mods run on all computers, all the mod files are placed somewhere else! You will find modded graphics can be anywhere inside here:
My Documents\My Games\Kudos 2\mods\bitmaps
and the layer files will be in
My Documents\My Games\Kudos 2\mods\layers
lets take a look at one of the layer files and see what all the bits do. This example is "female hair top 3.txt"
| [config] |
This has to be here for the file to work |
| Texture = "f_hair3.dds" |
This is the image file used when the character is in neutral mood |
| TextureHappy = "f_hair3_happy.dds" |
The file used when happy |
| TextureSad = "f_hair3_sad.dds" |
The file used when sad |
| Type = "AVATAR_HAIRTOP" |
This is the 'layername' which decides which category this graphic will fit into and also when it gets drawn (in relation to other layers) |
| Height = 128 |
The width in pixels of the image. Must be the same for all 3 moods |
| Width = 128 |
Height in pixels, must be the same for all 3 moods |
| OffsetY = -192 |
The amount of pixels that the images center is offset from the center of the avatar |
| OffsetX = 0 |
As above, but horizontally instead of vertically
|
| BaseColor = 254,217,121 |
The Red,Green and Blue values (out of 255) of the default color tint for this item |
| GUIName = "Woman's Hair 3" |
Shown on the interface, and also used by 'child' layers |
| Parent = "Woman 1" |
The GUIName of the 'base' avatar that this layer works with, so male or female |
| ChildType = AVATAR_HAIRBOTTOM |
The layername of any linked 'child' layers that get auto selected when we select this layer. In this case, selecting this hair layer automatically sets the hidden bottom hair layer. This can be empty if we don't link any layers. |
| ChildName = "Woman's Hair Bottom 3" |
Which layer we set the linked 'child' layer to when this layer is selected. This will be empty if the ChildType is also empty. |
The Images
The graphics files have to be made into 'dds' files. DDS is a file type often used by games that use 'directx'. You can get a dds plugin for photoshop or paintshop pro here. These plugins allow you to save out a file as a dds file. Kudos 2 saves out it's DDS files with the following settings:
Format: 8:8:8:8 ARGB (32 bit) MipMaps: No Mip Maps. Type: 2D Texture.
To make the game run faster you will find that a lot of the existing avatar layers are smaller than the avatar base images (which are 512 by 256 pixels). The images can be as small as you like (although DDS files have to be a 'power of two' in each direction), and positioned anywhere on the avatar using the offsets. However, there are only 1 set of dimensions and offsets for each group of three files (one for each of the three mood poses for the avatar). The images need to have an alpha channel saved out with them so the relevant parts are transparent.
Layers
This is the order the layers get drawn in from bottom(first) to top (last).
AVATAR_HAIRBOTTOM,
AVATAR_COATBEHIND,
AVATAR_SKIN,
AVATAR_GLASSES,
AVATAR_HAIRTOP,
AVATAR_SHOES,
AVATAR_CLOTHESBOTTOM,
AVATAR_CLOTHESTOP,
AVATAR_TIE,
AVATAR_COAT,
AVATAR_NUMLAYERS
Tips
I recommend taking one of the avatar base layers such as f_base.dds and creating a photoshop/psp document with it. You can then add the new clothing item as a new layer and check everything fits ok on the character. Then create an alpha channel from your new item of clothing, throw away the old base layer and export the remaining layer as a dds. Do the same for all 3 moods, then check to see if you can get away with cropping the image to save some space, and if neccesary change the image dimensions and offsets in the layer file. Put the files in the directories listed above and then run the game and check them out! Then make sure you post a link on the forums, I can host your files for free.
When you put together the artwork make sure you flatten your source image onto black once you have created the alpha channel. That way you get a ncie crisp black outline on the file, without any horrid blurring at the edges.
I love seeing people mod the games I design. If you run into any technical issues or need to know anything more about how they all fit together, email me at cliff@positech.co.uk.
|
|
| |
|
|